Menu
TOC
1) About
2) Installation
3) Quick Start
4) Dialog Editor
— Node types
— Dialog Start Conditions
— Video Time Events
5) Scene structure
6) Variables and persistence
— Variable types
— Persistence types
— Custom Fork Strategies
7) Condition editor
8) Subtitles
— Importing translated subtitles
9) Dialog text mode
10) Interactive scenes
— Text
— Buttons
— Depth
— Events
— CE Scripts
— CE Toolbox
— Keyboard Shortcuts
11) Customizing Appearance
12) Video
— Codec
13) Localization
14) Building your game
15) Extending the engine
— Variables
16) API Documentation
17) FAQ
18) Contact
Charles Engine Documentation
If you can't find an answer here, head to our Discord.
About
Charles FMV Engine is a comprehensive toolkit for a full-motion video project in Unity. You can combine videos and interactive scenes, use the variables system and other helpful utilities.
To learn about the basics of Unity visit https://learn.unity.com/
Installation
1) Create a new 2D project in Unity.
2) From the menu, go to Window > Asset Store.
3) In the asset store, search for Charles Engine.
4) From the result, click Charles Engine and then click Import.
5) In the Import Unity Package window, leave all the files and folders selected, and click Import.
Supported Unity Version: 2019.4+
Quick Start

After importing the package, the Charles Engine window should appear (or go to Tools/Charles Engine/About). Press Initialize. If prompted import TMP Essentials.
1) Create a new scene, open it, press Tools/Charles Engine/Init New Scene/Dialog.
2) Import your videos.
3) Click on the Dialogues object and press Edit.
4) Create a dialog tree with videos and choices.
5) Press play.
Check out the video tutorial series
Check out the included sample project for ideas and tips. It contains a sample main menu, which you can use in your game. Pause menu (which shows in the game after pressing Escape) is a prefab, you can edit it or you can replace it by another prefab in CESettings.
Dialog Editor
Dialogs must be started by calling StartDialog on DialogManager. Call it from the CEScene OnScreenShow event to start immediately. When you initialize a scene by Init New Scene/Dialog this is set up automatically.
Dialog is composed of dialog trees. Setup the first tree and a start node will be automatically created. Click on the + button to add more nodes or create a new disconnected node by right clicking anywhere. To connect existing nodes right click ‘connect’ and right click again to create a new connection. Change the type of node by right clicking it.
You can delete connections by right clicking their lines.
Node types
Start—the dialog starts from this node
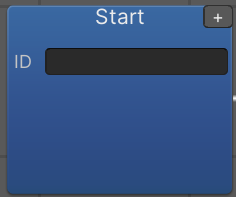
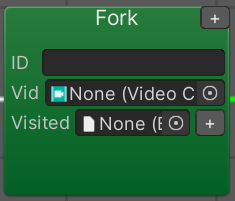
Video—ID—can be used to identify this node (e.g. in Connector)
Visited—add a bool variable and it will automatically be set to true, when user goes through this node
Specify a video to be played

Fork—shows a video on a loop and answer choices. Can have connections to multiple Answers nodes.
Answer—one answer choice, add/remove condition by pressing the C in the upper left corner
Order—all answers are sorted by this number, lower is higher
Text—the text of the answer
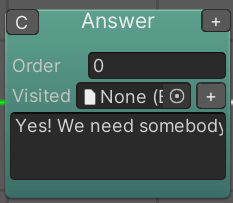
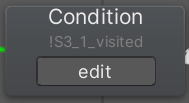
Condition—Shows a preview of the condition text, can be edited (see ConditionEditor )
Script—Link a script that should be run, the manager will not wait for the script to finish, it will continue immediately to the following node. Press Create to automatically create a multi-script component.

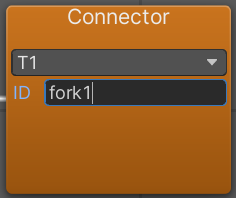
Connector—Allows you to connect trees together, set tree name and matching node ID
Switch—Can have multiple connections to other nodes. You can add conditions for each connection. Conditions are evaluated one by one from the top and the first success (or empty) triggers the transition to the corresponding node. (supports max. 4 connections)

Buttons on the upper left side allow you to:
• Switch Between Video and Text Mode
• Zoom in/out
• ⊙ center on the starting node / currently played node (in playmode)
• □ align nodes to a grid
If a node is RED there is something wrong with it (fork has no children, video node has no video, etc).
Dialog Start Conditions
Which node starts to play first can be influenced by these things.
• If you use switchToScene script, you can specify which node to switch to (treename/nodename)
• You can add a DialogStartCondition script (on DialogManager) and specify a condition and a node. • At the start of the dialog it will evaluate all conditions until one is true and start with the node specified.
• Otherwise dialog starts with the first tree and it’s starting node
Scene structure
SceneCamera—an orthographic camera prefab setup for the resolution in Settings.
SceneManager—CEScene script, has the OnScreenShow event that is run at the start of the scene.

Dialogues—attach Dialogues script, that holds the definition of the dialog data. It is editable with the Dialogue Editor

DialogManager—plays the dialog, needs a reference to the Dialogues

SceneRoot—all the visual parts of the scene should be here (Sprites, Texts, etc...).
Scripts—to make it nice, you can put all your scripts under this object. Automatically created scripts will be here.
Variables and Persistence
You can create variables to store values in your game. There are different types of variables, depending on what kind of values they store. For example a common feature is to hide some answers in dialog, if the player has already chosen them. We need a variable that will hold the information whether that answer was chosen. These binary true/false variables are called Bool Variables. You can create them in your assets by right-clicking in the project windows and selecting Create/Variables/Bool. You can specify the default value. In the dialog editor you can put this variable in the “visited” field of a node and it will automatically be set to true, when the player reaches this node.
Variable types
Bool—can only be true or false
Integer - can be any whole number, you can specify min/max values
StringSet—can hold a list of unique strings, can be used for things like an inventory
IntegerCalculation—when used in a condition it’s value is calculated based on the other referenced Integer variables. You can use it to add or subtract integer variables.
RandomBoolVariable—this one is pre-created in the project, everytime the value is read by any condition or script the value is chosen randomly with 50% chance of true/false. If you need to only choose randomly once, you can store the value in another variable—like this:

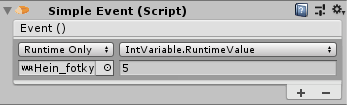
You can drag and drop variables to events to change or reset their value. You put them to conditions to check their current value. In play mode, clicking on a variable will tell you it’s current value (runtime).
Example—set int variable to 5:
It’s also possible to create custom variable types.
The engine keeps track of all your variables. You can use the Persistence to load and save the state of your game. If you use the supplied SampleMainMenuManager script that is used in the sample MainMenu scene, a new player profile is automatically created when the user first presses play. Every time the scene switches, the state of all variables is saved to a save file.
Variable types
Profile—Profile: saved for each profile
InMemory—In Memory: Only temporary value, reset on every scene change
Game—Game: saved for all profiles
Custom Fork Strategies
Sometimes you want a different behaviour for your fork. To keep things simple in the dialog editor this is done outside with CustomForkStrategy scripts.
There are three example types included and you can create your own in C#.
ForkNodeFollowLastAnswer—if there is just one answer left after evaluating all conditions it does not show it and immediately follows it to the next node.
ForkNodeWithSafety—you can specify a node to go to, in case there are no answers left.
ForkWithTimer—you can add a timer, if it runs out, the last answer is automatically selected.
Add these as a component in your scene and specify which fork it should attach to.
Condition Editor
Condition editor can be used to edit dialog conditions, conditional scripts and dialog start conditions.
It’s used to create any condition that uses integer, boolean or language types of variables.
Select a variable from assets and you get different options depending on its type. For boolean you can only check the NOT checkbox to indicate that the variable must be false, otherwise it must be true.
For integer types you can specify operator (equal, greater than, etc..) and a comparison value or you can specify another variable to compare to. For enum variables you should only use equal and not equal.
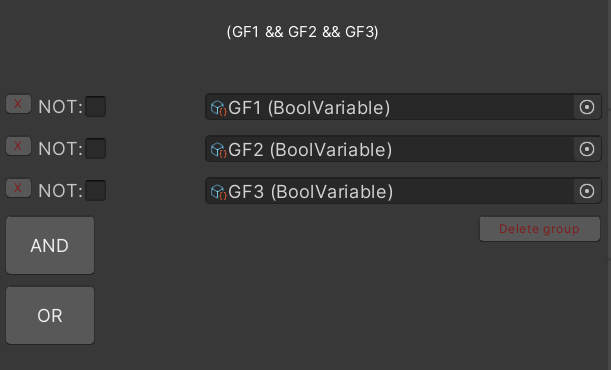
Statements can be grouped by the AND button, which means that all of them have to be true for the group to be true. You add a new group by the OR button, where at least one group has to be true for the condition to be true.
Examples
Vars GF1, GF2 and GF3 must ALL be true for the condition to be true:
At least one of the variables must be true for the condition to be true:

Subtitles
You can add subtitles for every video file in the form of videofilename_langcode.srt
Where langcode is one of the language codes from Settings (Charles Engine/About/Open Settings) and the videofilename must match the mp4 file (without the extension)—this means the video file name must be unique.
The importer will automatically convert them to txt and tag them with the subtitles tag.
Subtitles can also be added for sounds, in the same way. To play a sound with subtitles use PlaySound script and check the Has Subtitles checkbox.
Subtitles can be exported together as one file per language in the Subtitles Window (Charles Engine/Subtitles Window). The exported file can be found in the SubtitlesExport folder in the project root. It contains all the subtitles together with the identifiers for their respective files. These identifiers denoted by @ must not be altered.
This can be useful for proofreading and translation.
In this window you can also validate that all videos in a selected dialog have valid subtitles.
Importing Translated Subtitles
The exported file should be translated in place (replacing all text by the target language). Then rename the file with the lang suffix e.g. subs_en.txt or subs_de.txt
Add this file to the assets folder. Open the SubtitlesWindow—Import tab and select the file. The button should change to reflect the target lang. Press import for language and watch for any errors in the console.
If you are just adding individual subtitles don’t use SubtitlesWindow! just add them to the assets folder. The import is for the big file containing all subtitles from the project.
Dialog Text Mode
Before you create your videos it is often useful to prototype your dialog with text. You can switch the dialog component to Text Mode in the upper left corner of the Dialog Editor Window.
To run it, you need to replace the Dialog Manager component with the Text Dialog Manager component and if needed also update this change in the SceneManager in the CEScene component in OnScreenShow() event.
You can specify the font to be used in Charles Games Settings or you can supply a prefab to the TextDialogManager component which has to contain a TextMeshPro component as a child (this offers most flexibility).
In TextMode the texts do not continue automatically, they have to be advanced by pressing the spacebar.
Interactive Scenes
Interactive scenes are made of sprites and texts. You can make a sprite by dragging an image asset to your scene. All sprite renderers should be under the SceneRoot object in the hierarchy, which will happen automatically.
Sprites are processed by the import processor so that the units match with the specified design resolution in Settings—the pixels per unit is set to one. Sometimes you might want to have assets with greater resolution, you can add @2 at the end of the filename to indicate this asset is created for double the design resolution.
Text
Charles engine uses Text Mesh Pro to show text. To add a new text you can use the Tools/Charles Engine/Actions/Add Text. It will create a new object with the text mesh pro component and the font specified in Settings.
Buttons
To make a clickable button you can init a game object with Tools/Charles Engine/Actions/Init Button. It consists of several components. Sprite Renderer to show the graphics of the button. The collider component (e.g. BoxCollider2D, CircleCollider2D, PolygonCollider2D) that defines the clickable area. EventListener which gives you the events where you can hook in scripts to be run when the player clicks the button. Optionally you can also add the HandCursor component to make the cursor turn into a hand when hovering over the button (change the mouse_cursor.png to customize what it looks like).
Depth
Images and text can be above and below each other. This can be manipulated in two ways.
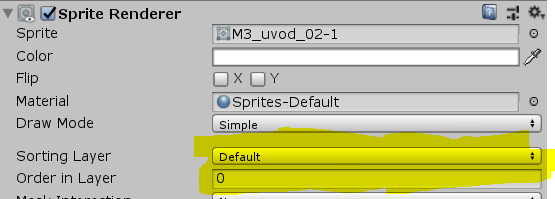
SpriteRenderer and TextMeshPro have a sorting layer and order
SpriteRenderer
TextMeshPro
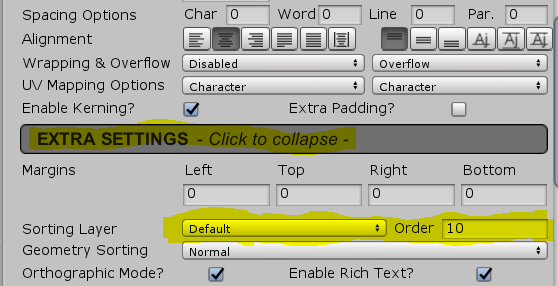
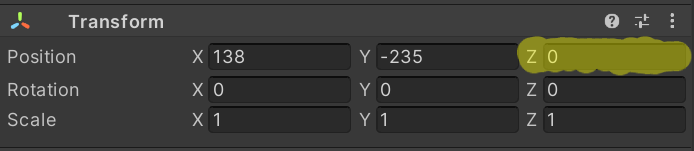
Colliders
To change the order of colliders (buttons) to put them closer or further from the camera, you have to directly change the Z value in the transform component. Smaller Z value means closer to the camera (should be between 0 and -10). Videos are at -9.
Events
All user scripting is done through Unity Events.
At the start of the scene a On Screen Show event is called at the Scene Manager.
You can drag a game object (or scriptable object - variables, etc) to this field and call any method on it. You can also specify string/boolean arguments.
Use the Debug scriptable object to print a message to the console for debugging (find it in the Engine folder).
CE Scripts
SimpleScript—just calls the event immediately. Use this to break events into smaller chunks to give structure.
MultiScript—calls all other CEScripts on the game object
ConditionalScript—run a script only if a specified condition is met
IfElseScript—same as conditional script but with an event for when the conditions is false
IfElseMultipleScript—reference multiple conditional scripts. This will go through them one by one until a condition is true, or if all scripts are false it runs the else script.
EventListener—the base for a button, needs a Collider2D component (e.g. BoxCollider2d)
SwitchToScene—changes the scene. check the Fade to black checkbox, if the scene should fade out to black before switching. Otherwise it will be instant. If switching to a dialog you can specify a specific node to visit. E.g. Tree1/Node23
Timer—call the event after a certain game time.
PlaySound—always use this for sounds, never use AudioSource directly. To stop the sound, call the StopSound function on this script. Also has FadeIn, FadeOut functions.
PlayVideo—always use this for videos, never use VideoPlayer directly
SetText—sets text to a specified TextMeshPro component
CE Toolbox
CEGameObject—This component adds utility methods like Hide, Show and HideAllChildren. Also you can specify if the object should start hidden at the start of the scene.
FadeInTween—Add this to a CEGameObject and it will fadein when you call Show on it. (don’t call this directly, CEGameObject calls it automatically on Show)
FadeOutTween—Add this to a CEGameObject and it will fade out when you call Hide on it. (don’t call this directly, CEGameObject calls it automatically on Hide)
AlphaGroup—when you want to fade in/out a group of objects (texts and sprites) put them under an alpha group with a CEGameObject with FadeInTween/FadeOutTween components. This way they will be faded together.
VariableDisplayText—allows you to display text with a variable part, e.g. You have 5 coins left. Use # in place of the int variable that you want to substitute.
Comment—Add this component to any longer scripts to describe the intent behind it.
Keyboard Shortcuts
Ctrl + Shift + T: adds a preset text node to the selected game object
Ctrl + Shift + E: add button components to the selected game object
Customizing Appearance
To customize the way choices are presented to the player, you edit the ChoiceLayoutDefault and ChoiceLayoutDefaultLine, which are linked in the settings. Or you can create your own layout script, which must implement the IDialogChoiceLayout and be on the root game object of the prefab.
There is a main menu scene in the samples which you can use as it, or customize for your game. You can find the pause menu prefab linked in the settings (Tools/Charles Engine/About—Open Settings).
To change the default look of the subtitles change the Subtitles prefab in the prefabs folder.
You can customize the pause menu prefab or create your own, where the engine expects a component extending PauseMenuBase to be present on the root game object of the prefab.
Video
Use PlayVideo to play video in an interactive scene. Can FadeIn/Out. To run a script on movie time add a ScheduleTimeEvent component (you can add multiple).
You should not need to use CEVideoPlayer or Unity VideoPlayer directly!
Codec
For unity supported codecs visit link.
A good choice for a fmv game is something like 7000 kbps/s bitrate, aac sound, mp4 format, H.264 codec.
We can recommend the free Handbrake software to convert your videos.
Localization
In order to use the I2C localization plugin, after you import it to your project, go to Tools/Charles Engine/About and check the first checkbox. This should trigger a recompile and afterwards all dialog answers are expected to draw texts from I2C.
To localize answer texts, specify the localization prefix in a dialog start node. It specifies the page in google drive localization from which the texts are taken.
Building your game
To export your project, build the game through the File/Build Settings menu option. Make sure the Master scene is included in the list of scenes. The first scene in the list will be the starting scene.
Also if you did not make your own MainMenu scene, make sure the default one is included, as this is the scene the engine will try to load when the user clicks exit game in the default pause menu.
Export issues:
1) check your Build Settings scenes. (see above)
2) Check your settings (Charles Engine/About/Open Settings) or try deleting them (which should prompt a reinitialization
3) Try to refresh your VariableManager. Find the VariableManager object in the project view, in the inspector, click the top left context menu and select Refresh. Save the project and reexport.
Extending the engine
The way the engine works is that it keeps all these global scripts in a separate scene (Master.scene) that is additively loaded at the start of the game. You can edit this scene and add your own component. If you add a prefab to the custom globals field in Settings, it will be automatically instantiated when the master scene is loaded.
Dialog observer—To extend the dialog tree functionality you can attach a new component to your DialogManager object that extends the DialogObserver class. If you override the NodeVisited function, you can add custom functionality to any nodes.
CEScript—you can create your own scripts by extending the CEScript class and implementing the Run method. It will then work with MultiScript, SimpleScript, etc..
Variables
You can create your own variable types, just by extending the generic Variable class with your custom type. Custom enum variables should extend EnumVariable
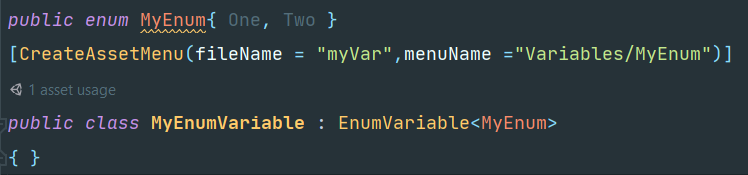
Other serializable types should extend the Variable<> class.
API Documentation
If you want to extend the functionality of the engine with scripting you can use some of these API methods. All these classes are referenced by a static Globals class.
Class Persistence
Methods
void SetProfile(string profileName)
Sets the name of the current profile, also this will be the file name of the save.
void SaveProfile(string currentScene)
Saves all variables and the current scene into a save file on disc.
SaveFile LoadProfile(string profileId)
Tries to load the profile from a saved file. Will return null if not found (or data cannot be parsed to a SaveFile struct.
void ResetMemoryVars()
Resets all memory variables to their default values. This is called by the engine with every scene change.
void ResetAll()
Resets all variables to their default values.
bool HasSavedGame(string profileName)
Returns true if a save file is found with the corresponding name.
void DeleteProfile(string profileName)
Deletes a save file if it exists.
Class GameManager
Methods
void LoadScene(string sceneName, bool fadeOut = false)
Additively loads the next scene and unloads the previous one. Keeps the master scene loaded. Correctly initializes the CEScene component during load.
void PreloadScene(string sceneName)
Preloads the scene for a faster transition. Useful when you know what scene is coming next and want to decrease the loading time.
void RegisterInputHandler(IInputHandler handler, int priority)
You might use this system to handle input based on priority so that it is clear which scripts are informed first of an input (and they can decide to stop the propagation by returning true). This system is optional, but used by the engine internally.
bool HasInputHandler(IInputHandler handler)
Checks if this handler is already registered.
void RemoveInputHandler(IInputHandler handler)
Removes the handler from the list of current handlers. Good practice is to keep this in the OnDisable method of your scripts.
Class GameInput
Methods
bool GetKeyUp(InputAction action)
You can use these instead of the Unity input system in the HandleInput, registered via RegisterInputHandler in Globals.GameManager.
bool GetKeyDown(InputAction action)
Class CEUtils
Methods
int Delay(Action action, float delay)
Use this to schedule an action. Unlike Invoke this will take into account if the game is currently paused.
int Delay(Action action, float delay, T arg)
Same as above, but with an argument.
Same as above, but with an argument.